
Sep 20, 2023
Share:
Subscribe now and get our latest blog and video content delivered straight to your inbox.
Sep 20, 2023
The installation of a wood burning furnace is typically a pretty involved process. It can involve hiring a sheet metal fabricator, an HVAC professional, an electrician, and maybe even a mover to get the furnace to its desired location. And if you’re like most buyers, the thought of a self-installation won’t even cross your mind — many people simply defer to the professionals.
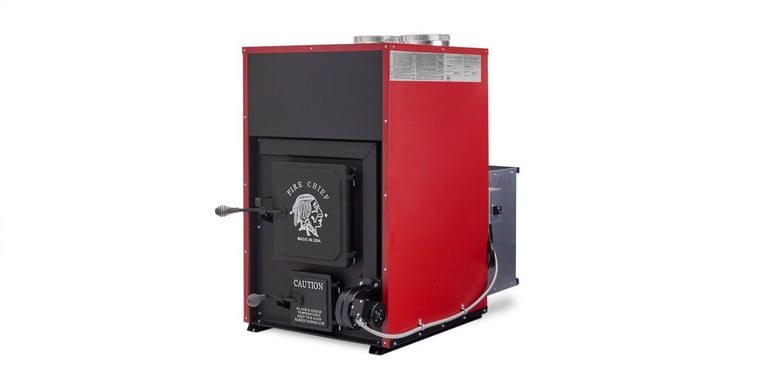
If you’re DIY-inclined, though, and you end up buying one of HY-C’s Fire Chief FC1000E furnaces, you’re in luck: we designed it to be about as self-install-friendly as a wood burning furnace can be. So if you’re interested in installing your FC1000E without professional help, you’re in the right place.
By the time you’re done with this guide, you’ll understand the 9 steps of the Fire Chief FC1000E’s installation process, and you’ll be ready to hook your new wood burning furnace up all on your own — no professional assistance required.
9 Steps of the Fire Chief FC1000E’s Installation Process
Step 1: Place the furnace as close to the chimney as possible

The first step sounds easy: put the furnace where it needs to go. It’s tougher than it sounds, though, as wood burning furnaces are heavy; the FC1000E weighs over 400 pounds, and most wood burning furnaces are installed in basements. Maneuvering the furnace into your house and into place is a delicate process, so do it carefully and thoughtfully (preferably with a dolly).
Installing the chimney flue is critical to ensuring efficient wood burning performance. Note that the connecting pipe from the furnace to the chimney may not have a horizontal run greater than five feet to function properly, so place your furnace accordingly.
It’s also crucial to abide by the FC1000E’s suggested clearance-to-combustibles ranges — the distances from which the furnace must be kept from any flammable materials (like drywall, wood, cardboard boxes, etc.). These distances are as follows:
- Front of the furnace: 48”
- Rear of the furnace: 12”
- Sides of the furnace: 6”
Before moving on to step 2, if you would like to set your furnace on a furnace stand, now’s the time to do it.
Step 2: Attach the distribution blower

The distribution blower is the big, motorized fan that pushes warm air created by the fire in the firebox throughout the rest of your home. Attaching the FC1000E’s distribution blower is fairly straightforward: the furnace comes with angle brackets, nuts, bolts, and mounting screws.
Just attach the angle brackets to either side of the distribution blower with the nuts and bolts, and then secure the distribution blower to the base of the furnace with the mounting screws.
Step 3: Assemble and attach the filter box

An air filter helps to protect the distribution blower and circulate clean air throughout your home. In order to add an air filter, you have to assemble the filter box. The box consists of four panels — a bottom panel, a top panel, and two side panels. Each panel comes with pre-drilled holes and sheet metal screws for easy assembly.
Put the filter box together and attach it to the furnace around the distribution blower. After you’re finished installing your furnace, slide an air filter into the filter box. Do note that the FC1000E does not come with an air filter.
Step 4: Install the draft blower
While the distribution blower is the fan that blows hot air from the furnace into the rest of the home, the draft blower is a smaller fan that blows air directly onto the fire to keep it burning longer and hotter. Installing the draft blower on an FC1000E furnace involves 3 steps.
1. Attach the draft blower

The first step is to use the included hardware to mount the draft blower itself onto the front of the furnace (near the ash pan door).
2. Mount the electrical control center

Next, attach the electrical control center to the filter box. Two important components will connect to the electrical control center: a wall thermostat (to help regulate how much heat your furnace puts out), and the distribution blower.
The wall thermostat must be connected with 28-gauge thermostat wire (more on that in a bit). The distribution blower, on the other hand, features “plug and play” electrical components that plug into the control center similarly to a wall outlet.
3. Attach the fan limit control

Finally, attach the fan limit control just to the left of the flue exit. The fan limit control is the mechanism that tells the distribution blower when to turn on and off. It does so by detecting the temperature in the plenum — the open area in the top of the furnace just beneath the two ductwork attachment points.
With these three components installed, the draft blower installation process is complete.
Step 5: Install a thermostat

Connecting your FC1000E furnace to a thermostat allows the distribution blower and draft blower to know when to turn on and off to deliver (or stop delivering) heat. We recommend installing a new, separate thermostat (included with your FC1000E furnace) next to your current household thermostat.
A lot of this step should already be done for you: if you have a gas or electric furnace in your home, it should be connected to your current thermostat. We recommend running 28-gauge thermostat wire along the same path as the wiring to your existing home thermostat.
From there, just mount your new, Fire-Chief-specific thermostat on the wall next to your existing thermostat, and connect the 28-gauge wire to the new thermostat and your furnace (the connecting points on the furnace are located on the electrical control center from step 4.2).
Step 6: Connect your furnace to a chimney

When connecting your furnace to a chimney, you have two options:
- Connect the furnace to an already-existing chimney
- Build a new chimney and connect your furnace to it
Connecting to an existing chimney is common in older houses that have (or previously had) a coal or wood burning stove. Whatever the case, if you’re connecting to an existing chimney, be sure to have it inspected to ensure it’s in proper working order. It’s also very important not to connect your Fire Chief furnace to a chimney that’s already servicing another appliance.
Each homeowner’s chimney connection process will be unique. But whether you’re installing a new chimney or connecting to an existing chimney, here are a few tips to keep in mind:
- We encourage lining the chimney with a 6” stainless steel chimney liner (this may be required by law in some areas)
- The pipe connecting the furnace to the chimney should be a minimum of 24-gauge black stove pipe
- If you need to install any pipe horizontally, remember that there should be 2” of rise for every 12” of horizontal run
Finally, NEVER use galvanized pipe to connect your wood furnace to your chimney. Doing so will result in the generation of deadly, poisonous gas. Galvanized pipes should be used for air ducting only.
Step 7: Connect your furnace to your ductwork

Next, it’s time to connect your furnace to your HVAC system. Like the chimney connection, each ductwork connection project will be unique. It’s important to note, though, that the two starter collars at the top of the furnace are eight inches in diameter, which necessitates 8” ducts.
You should never use more than a 45-degree elbow when connecting ducts; this will cause the heat not to be distributed correctly. The distribution air should be connected to the ducts at an angle, and should be directed downstream to ensure proper airflow as well.
Step 8: Connect the cold air return

Your furnace’s main function is to distribute heat into your home. Perhaps equally important, though, is to allow air to flow through the filter and into the back of the furnace to keep it functioning properly.
To provide this return air, the simplest option is to promote proper circulation to the area which houses your furnace — usually a basement. There are three good ways to ensure proper air circulation:
- Simply leaving the door to your basement open
- Installing louvers in the basement door
- Installing vent registers in the basement’s return air ducts
If you decide to install vent registers in the basement’s return air ducts, be sure to keep them closed in the summer to allow your air conditioning system to function properly.
If you still have your electric or gas furnace attached to your HVAC system, another option for supplying return air to your Fire Chief furnace is to connect it to the same, already-installed return air system of your existing furnace.
Should you decide to go this route, a word of caution: be sure your existing furnace does not pull your Fire Chief’s heated air into the return air ducts. To prevent this, simply install a damper to the distribution air duct of your existing furnace.
Step 9: Start your first fire

After the electrical components are installed, the chimney is connected, the distribution air ducts are set up, and you’ve ensured your Fire Chief is receiving adequate return air, the installation process is complete! All that’s left to do is plug the furnace into an electrical outlet and start your first fire.
A quick note — if you notice a moderate amount of smoke coming off of your furnace during your first few fires, don’t worry! This smoke is coming from the oils used during the manufacturing process in our factory. The issue should dissipate on its own relatively quickly.
What if You Have Trouble Installing Your Fire Chief FC1000E?
While this guide should give you everything you need to get your furnace installed properly, we know that every installation is unique. Should you run into any problems, reach out to our customer service team. We’ll be more than happy to help you with any issues you may experience during installation.
