You’ve gone through the process of finding the perfect chimney cap. You found your flue dimensions, you picked the metal you wanted, and you finally pulled the trigger on your purchase. But as you unboxed your new cap, you suddenly realized you had a question: “How do I install this thing, anyway?”
We live and breathe chimney caps at HY-C. We’ve sold thousands of them over the years, and we design our caps with ease of installation in mind. Our customer service team has answered countless questions from contractors, roofing professionals, and chimney sweeps about how to install our caps, and we want to share what we know with you.
In this guide, we’ll cover the installation process for seven of the most common types of chimney cap styles (click on a link to jump straight to your chimney cap style's installation guide):
By the time you’re finished with this guide, you’ll be able to identify what type of installation process your chimney cap requires, and you’ll have all the tools necessary to facilitate the installation of your own cap to keep your home protected.
Before You Install Your Chimney Cap…
Before installing your chimney cap, note that HY-C does not recommend climbing your own roof. Working on a roof is dangerous, and falling off your roof could result in serious bodily harm. Chimney cap installations are better left to roofing and chimney professionals; the content in this guide is strictly informational.
Note too that HY-C chimney caps come with all the hardware required for installation. Be sure your installer examines this hardware before installation to ensure they have the correct screwdrivers or drill bits for the job before ascending your roof.
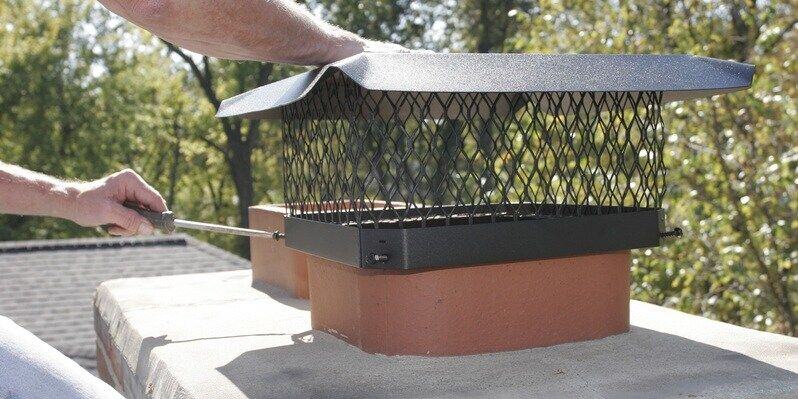
How to Install a Bolt-on Chimney Cap

Bolt-on, single-flue chimney caps are some of the most common stock chimney caps we sell. These caps can be square, rectangular, or round, and they come in many different sizes to accommodate a wide range of flue styles and dimensions.
The installation process for these caps is pretty straightforward. To start, make sure your cap has the right dimensions to match your flue tile. The five most common flue dimensions for square or rectangular flues include:
- 9” x 9”
- 9” x 13”
- 9” x 18”
- 13” x 13”
- 13” x 18”
Most square or rectangular flues fall within these dimensions. Whether your flue fits within these sizes or it’s larger or smaller, be sure that the cap you buy is tailored to fit your flue (manufacturers offer information on which caps fit which flue sizes in their product catalog or on product description pages online).
Once you’ve ensured you have the correctly sized cap, just slide the cap over your flue and tighten the four bolts on the cap’s corners.
 Close-up of a rectangular bolt-on chimney cap attached to a flue
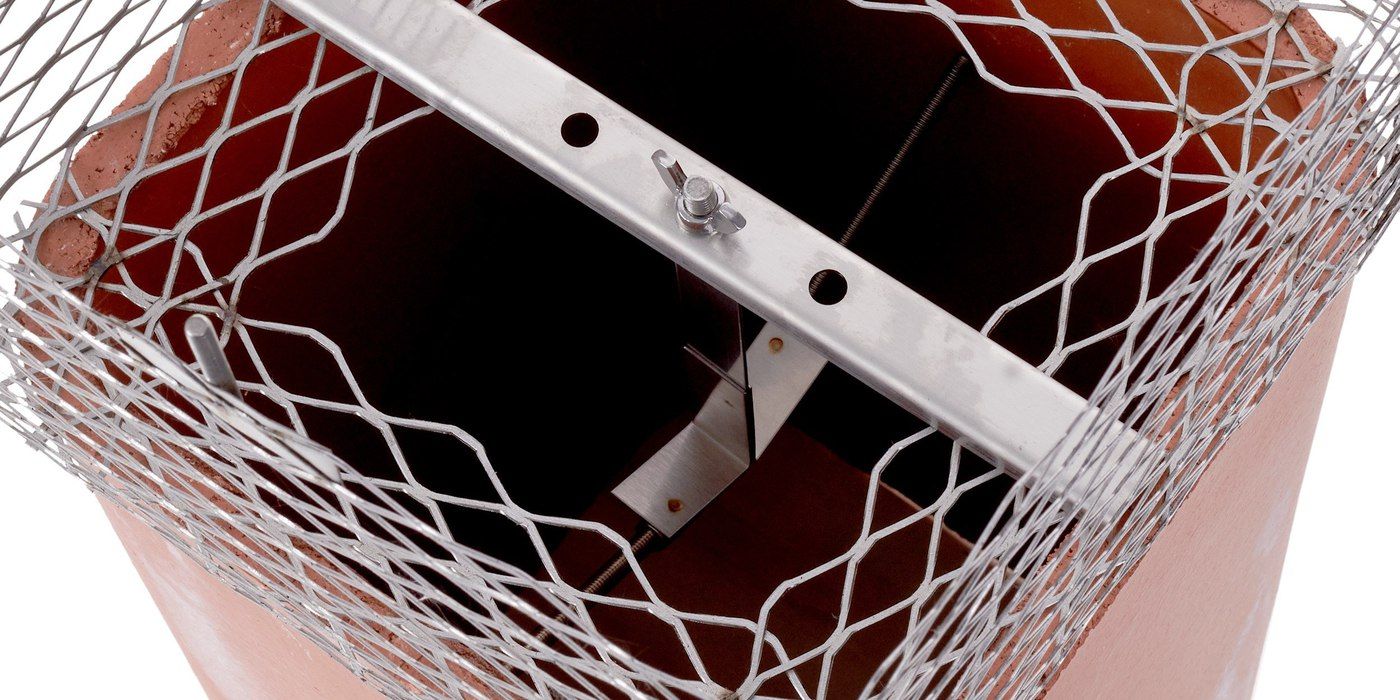
The bolts should not penetrate the chimney flue tile. To protect the flue, some bolt-on chimney caps include a metal ridge that rests between the bolt and the flue to protect the integrity of the flue tile while allowing the cap to connect securely.
 Close-up of the protective metal ridge on a bolt-on chimney cap
If you have a round flue instead of a square or rectangular flue, there are bolt-on-style caps made for your chimney, too. The most common diameters for a round chimney flue include:
- 6″
- 8”
- 10”
- 12”
- 14”
The installation process is identical for round chimney caps — just ensure your cap’s size is correct, slide the cap onto the flue, and tighten down the four bolts until the cap is secure.
 Close-up of a round bolt-on chimney cap attached to a flue
How to Install a Multi-Flue Chimney Cap

If your chimney has two or more flues on it, you have a couple of options: you can get a single-flue cap for each individual flue, or you could get one big cap that covers all the flues at once. These are called multi-flue chimney caps, and they’re installed quite a bit differently than bolt-on, single-flue caps.
For starters, multi-flue chimney caps don’t attach directly to the flues. Instead, they attach to the crown of a chimney — the concrete portion that seals the flue and the top layer of brick together.
In order to attach to the crown, multi-flue caps come with four 2” flanges that are attached perpendicularly to each of the cap’s four mesh screens. These flanges have holes in them to accommodate screws that go directly into the chimney’s crown.
 Close-up of a multi-flue chimney cap’s flanges
To start the installation process, set the cap on top of the crown, ensuring that the edge of each flange is at least one inch from the edge of the crown. If the flanges are too close to the end of the crown, the crown could crack when holes are drilled and screws are put in.
Once the cap is set in the right position, trace a line around the edges of the flange, and mark the hole positions for each masonry screw. The location of the screws can vary from crown to crown. Some crowns may require one screw in each flange, while others may work better with two screws on opposite flanges. Screw placement depends on how level (or unlevel) your cap is as it rests on the crown. Use your best judgment based upon how the cap is seated on the crown.

Once a line is traced around the flanges and the screw holes are marked, take the cap off, set it aside, and use a 3/16” drill bit to drill 1.5” holes into each mark. Brush away any loose material, and run a bead of adhesive (provided with the cap) about ½” inside the trace line you drew around the flanges.
From there, simply put the crown back in precisely the same spot along the traced line, applying pressure to seat the crown to the adhesive. Screw the masonry screws into the 1.5” holes to secure the cap in place, and the installation will be complete.
How to Install a Band-Around-Brick Chimney Cap

It’s easy to see how a band-around brick chimney cap gets its name: the band of metal on the bottom of the cap goes around the top layer of chimney brick, secured in place with nuts and bolts. Band-around-brick caps are versatile. They come in four sizes, each featuring 2” of adjustability, and they’re designed to fit chimneys with top layers of brick measuring:
- 15.5” x 15.5” to 17.5” x 17.5” (square)
- 16.5” x 16.5” to 18.5” x 18.5” (square)
- 16.5” x 20.5” to 18.5” x 22.5” (rectangular)
- 20.5” x 20.5” to 22.5” x 22.5” (square)
The installation process is pretty straightforward: once you have the correctly sized cap for your chimney’s dimensions, slide the cap’s band over the top layer of chimney brick. The magic of a band-around cap lies in its adjustable corner pieces, each secured by four nuts and four bolts.
 Close-up of a band-around-brick chimney cap’s corner pieces
Simply tighten the nuts and bolts on each of the four corners until the cap fits securely in place around the top layer of chimney brick. The cap is held in place solely by tension and pressure, requiring no drilling into the crown or brick.
How to Install a Multi-Fit Chimney Cap

Multi-fit chimney caps provide a great deal of flexibility. These caps, designed to fit on a single chimney flue, are made for square, rectangular, and round flues. They come in three sizes: small, medium, and large. The three sizes can fit chimneys with the following ranges of dimensions:
| Small | Medium | Large |
| 7″ x 7″ to 9.5″ x 9.5″ (square) | 11.5″ x 11.5″ to 13.5″ x 13.5″ (square) | 17.5″ x 17.5″ x 18.25″ x 18.25″ (square) |
| 11.5″ x 11.5″ to 13.5″ x 13.5″ (square) | 11.5″ x 17″ to 13.5″ x 18.25″ (rectangular) | 13″ to 14.5″ (round) |
| 7″ x 11.5″ to 9.5″ x 13.5″ (rectangular) | 7″ x 17.5″ to 9.5″ x 18.25″ (rectangular) | 16″ to 17″ (round) |
| 9″ to 10″ (round) | 11.5″ x 12.5″ to 12.5″ x 16.5″ (rectangular) | 17.5″ to 18.25″ (round) |
| 11.5″ to 12.5″ (round) | – | – |
When you’ve found the appropriate size for your flue, the installation process begins with attaching the four braces to the top cover of the chimney cap. Be sure not to completely tighten the bolts yet.
 Top-down view of a multi-fit chimney cap with four red arrows to indicate the brace attachment points
From there, the other ends of the braces clamp down onto the chimney flue tile by tightening the bolts. After the cap is securely attached to the flue tile, you may finally tighten the bolts protruding from the top cover of the chimney cap to complete the installation.
 Close-up view of the braces of a multi-fit chimney cap attached to flue tile
How to Install an Adjustable Bolt-on Chimney Cap

Like multi-fit chimney caps, adjustable bolt-on chimney caps are also flexible. But the flue dimensions onto which they can fit are a bit more limited. These caps come only in sizes small and large, and they’re designed to fit flues with the following ranges of dimensions:
| Small | Large |
| 8″ x 8″ (square) | 13″ x 13″ (square) |
| 9″ x 9″ (square) | 8″ x 17″ (rectangular) |
| 12″ x 12″ (square) | 9″ x 18″ (rectangular) |
| 13″ x 13″ (square) | 12″ x 16″ (rectangular) |
| 8″ x 12″ (rectangular) | 13″ x 18″ (rectangular) |
| 9″ x 13″ (rectangular) | – |
| 8″ (round) | – |
| 10″ (round) | – |
| 12″ (round) | – |
Adjustable bolt-on chimney caps are held together by four L-shaped braces, and the portion of each brace attached perpendicularly to the cap’s mesh has a slot in it. Those four slots each accommodate a U-shaped bracket that slides into the slot and twists to prevent it from falling out. The brackets can slide along the slots to fit multiple flue sizes.
 Close-up view of an adjustable bolt-on cap’s U-shaped bracket and the slot it slides on
After sliding the U-shaped brackets to fit your specific flue size, just slip the brackets onto the flue tile and tighten the bolts. After the cap is secure, the installation is complete.
How to Install a Slip-in Chimney Cap

A slip-in chimney cap is likely the easiest kind of chimney cap to install. Perhaps the most difficult part of the process is making sure you have the correct cap to fit your flue’s dimensions. Slip-in caps come with about an inch of wiggle-room; they’re designed for round flues and made to fit within the following diameter ranges:
- 9.5” to 10.5”
- 11.5” to 12.5”
- 13.5” to 14.5”
- 15.5” to 16.5”
- 17.5” to 18.5”
There’s not much to the installation process. These caps require no hardware or tools. All you have to do is slip it into the flue tile, and the angle of the legs, combined with tension from their tendency to bend, hold the cap firmly in place.
 Close-up view of the legs of a slip-in chimney cap
How to Install a Universal Chimney Cap

Universal chimney caps come in two different sizes:
- 13” x 13” (screen-to-screen) (square)
- 13” x 20” (screen-to-screen) (square)
They’re designed to fit chimney flues with those specific dimensions, and they feature a unique inside anchoring system for their installation process. The mesh screen of these caps tucks in at a 90° towards the chimney flue. To start the installation process for a universal chimney cap, simply unscrew the wing nuts at the top of the cap and remove the top cover.
 Close-up view of the inside anchoring system of a universal chimney cap
Next, set the cap on the flue so its mesh hangs over the edge of the flue. From there, slide the V-shaped anchoring bar down into the chimney, ensuring that both ends of the anchor touch the walls of the flue. Next, set the cap’s straight metal bar on the mesh perpendicular to the V-shaped anchor.
Slide the top of the anchor bar through one of the three holes in the straight metal bar (whichever hole it lines up with best), and thread the wing nut onto the anchor bar. Tightening the wing nut will create tension between the V-shaped anchor, the metal bar, and the chimney cap’s mesh. Once the apparatus is secure, reattach the cap’s cover, and the installation will be complete.
What if Your Flue or Chimney Can’t Accommodate These Chimney Caps?
At the beginning of this article, you likely had no idea how to install your chimney cap (or even which installation style your cap was made with). By now, you should know the ins and outs of which kind of cap you have and how to install it onto your flue.
Some homeowners may find, though, that their flue (or the entire chimney, depending on what kind of cap you have) doesn’t fit within the dimensions of any of the seven caps described above. If that’s the case for you, it’s possible that you need a custom chimney cap.
If you find that you need a chimney cap that doesn’t fit common chimney dimensions, you’re in luck — HY-C manufactures three different varieties of custom chimney caps. And whether a standard installation works for you or you need something with a more specialized touch, we’re happy to work with you to make sure your chimney is covered and your home is secure.

Topics: